- Donald Knuth
When you're building Rails apps and having fun building new features, it's easy to lose track of what's actually happening behind the scenes. You don't always know what queries are being run, how long they're taking, or how many objects Rails is allocating during a single request.
We often don't notice these issues during development, as we typically work with small data. However, in production, where you are working with larger datasets, all these problems can lead to slow page loads, wasted memory, and a frustrating user experience. When performance starts to drag, the blame often lands on the framework itself: "Rails doesn’t scale."
But before you decide to rewrite your app from scratch in Rust, it's worth taking a step back and profiling your application. You might discover that you're running unnecessary queries, allocating objects you don't need, or doing things inefficiently without realizing it. That’s where observability tools can make all the difference.
For Rails profiling, I've always used Sam Saffron's excellent rack-mini-profiler gem, but recently came across Rails Debugbar (created by Julien Bourdeau), a profiling tool that was inspired by the Laravel Debugbar. It gives you a detailed look at what your app is doing—SQL queries, object allocations and more—all in the browser.
In this post, we’ll use Rails Debugbar to profile and analyze the performance of a basic Rails app. We’ll start with a intentionally inefficient version, then walk through a few improvements to make it faster. In the process, we'll also learn about the common N+1 problem that you typically run into when working with ORMs.
rack-mini-profiler. However, I really liked Debugbar’s UI — especially how clearly it displays the number of instantiated models — so I thought I’d share it. You can try it out and see if you like it.That said, for more advanced profiling, you should still use
rack-mini-profiler. Nate Berkopec has an excellent post on advanced profiling techniques that’s well worth a read.Project Setup
To show how Rails Debugbar works, I've created a simple Rails application with two models: Team and Member. Here's the database schema:
create_table "members", force: :cascade do |t|
  t.integer "team_id", null: false
  t.string "name"
  t.string "email"
  t.datetime "created_at", null: false
  t.datetime "updated_at", null: false
  t.index ["team_id"], name: "index_members_on_team_id"
end

create_table "teams", force: :cascade do |t|
  t.string "name"
  t.datetime "created_at", null: false
  t.datetime "updated_at", null: false
end
Here are the corresponding models:
class Team < ApplicationRecord
  has_many :members
end

class Member < ApplicationRecord
  belongs_to :team
end
Seeding the Database
We’ll use the Faker gem to seed some sample data. The script below creates 10 teams, each with 50 members—giving us a total of 500 member records to work with:
# seeds.rb

require "faker"

10.times do
  team = Team.create(name: Faker::Company.name)
end

Team.find_each do |team|
  50.times do
    Member.create(name: Faker::Name.name, email: Faker::Internet.email, team_id: team.id)
  end
end
Routing and Controller
Next, we’ll add a basic route to list all members:
# config/routes.rb
resources :members, only: [:index]
Here's the controller class.
# controllers/members_controller.rb
class MembersController < ApplicationController
  def index
    @members = Member.order(:name)
  end
end
Rendering the View
For the UI, we’ll render the members in a simple table styled with Tailwind CSS:
<div class="container mx-auto px-4 py-8">
  <h1 class="text-2xl font-bold mb-6">Members</h1>

  <div class="overflow-x-auto bg-white rounded-lg shadow">
    <table class="min-w-full divide-y divide-gray-200">
      <thead class="bg-gray-50">
        <tr>
          <th scope="col" class="px-6 py-3 text-left text-xs font-medium text-gray-500 uppercase tracking-wider">
            Name
          </th>
          <th scope="col" class="px-6 py-3 text-left text-xs font-medium text-gray-500 uppercase tracking-wider">
            Email
          </th>
          <th scope="col" class="px-6 py-3 text-left text-xs font-medium text-gray-500 uppercase tracking-wider">
            Team
          </th>
        </tr>
      </thead>
      <tbody class="bg-white divide-y divide-gray-200">
        <% @members.each do |member| %>
          <tr class="hover:bg-gray-50">
            <td class="px-6 py-4 whitespace-nowrap text-sm font-medium text-gray-900">
              <%= member.name %>
            </td>
            <td class="px-6 py-4 whitespace-nowrap text-sm text-gray-500">
              <%= member.email %>
            </td>
            <td class="px-6 py-4 whitespace-nowrap text-sm text-gray-500">
              <%= member.team.name %>
            </td>
          </tr>
        <% end %>
      </tbody>
    </table>
  </div>
</div>
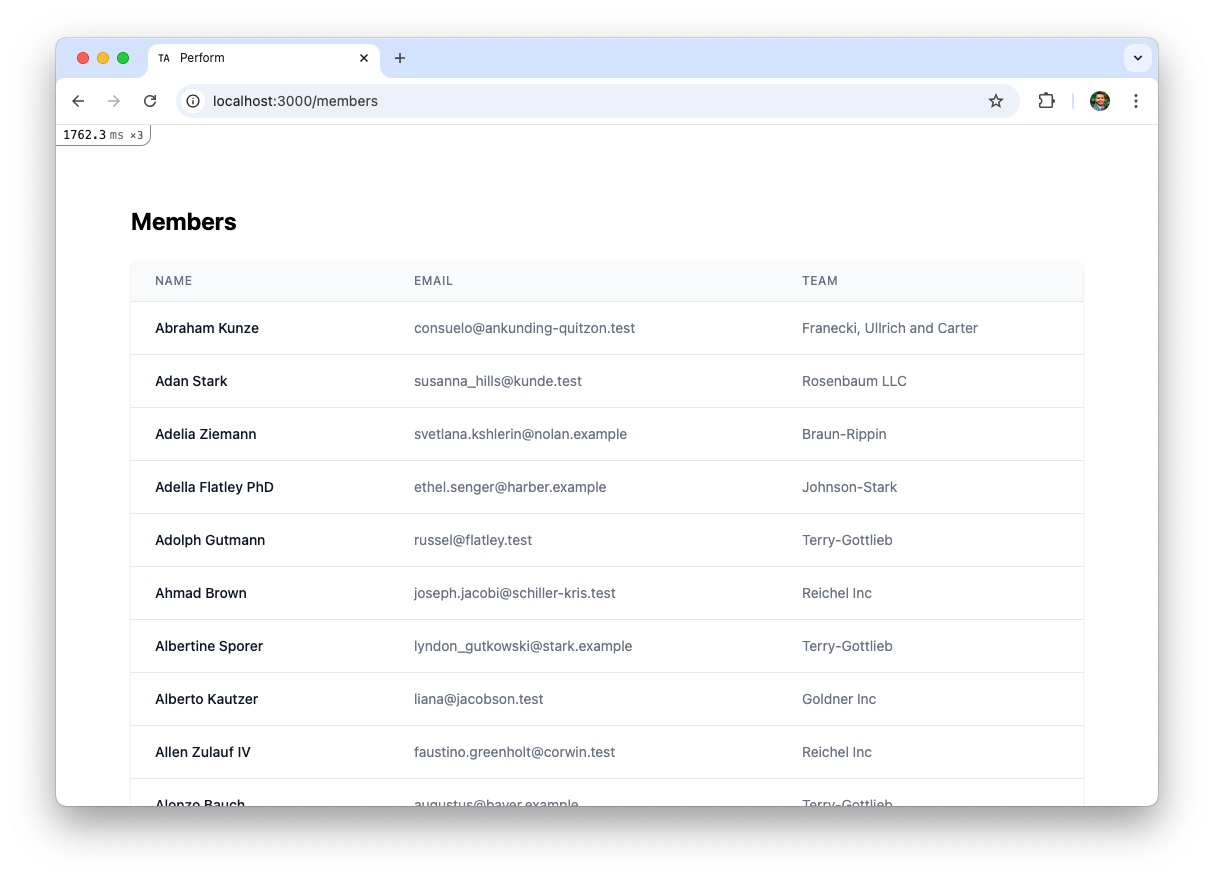
Once everything is wired up, visit the /members endpoint. You should see a nice table with all 500 members ordered by name.

Note that I've added rack-mini-profiler, which shows the total page load time in the top-left corner. Right now, it's taking nearly 2 seconds on average to render this page. Not good.
That's it. We're done with the project setup. Now let's install the Debugbar and start digging into the performance details.
Installing and Using Rails Debugbar
The installation instructions provided on the Debugbar documentation are pretty straightforward, but here’s a quick walkthrough to get you up and running.
First, add and install the gem as a dev dependency.
group :development do
  gem 'debugbar'
end
Then install it:
$ bundle installNext, we need to display the Debugbar panel on your application. Debugbar provides nice helper methods for this, simply include the debugbar_head and debugbar_body helpers in your layout:
<!DOCTYPE html>
<html>
  <head>
    ...
    <%= debugbar_head  if defined? Debugbar %>
  </head>

  <body>
    ...
    <%= debugbar_body if defined? Debugbar %>
  </body>
</html>
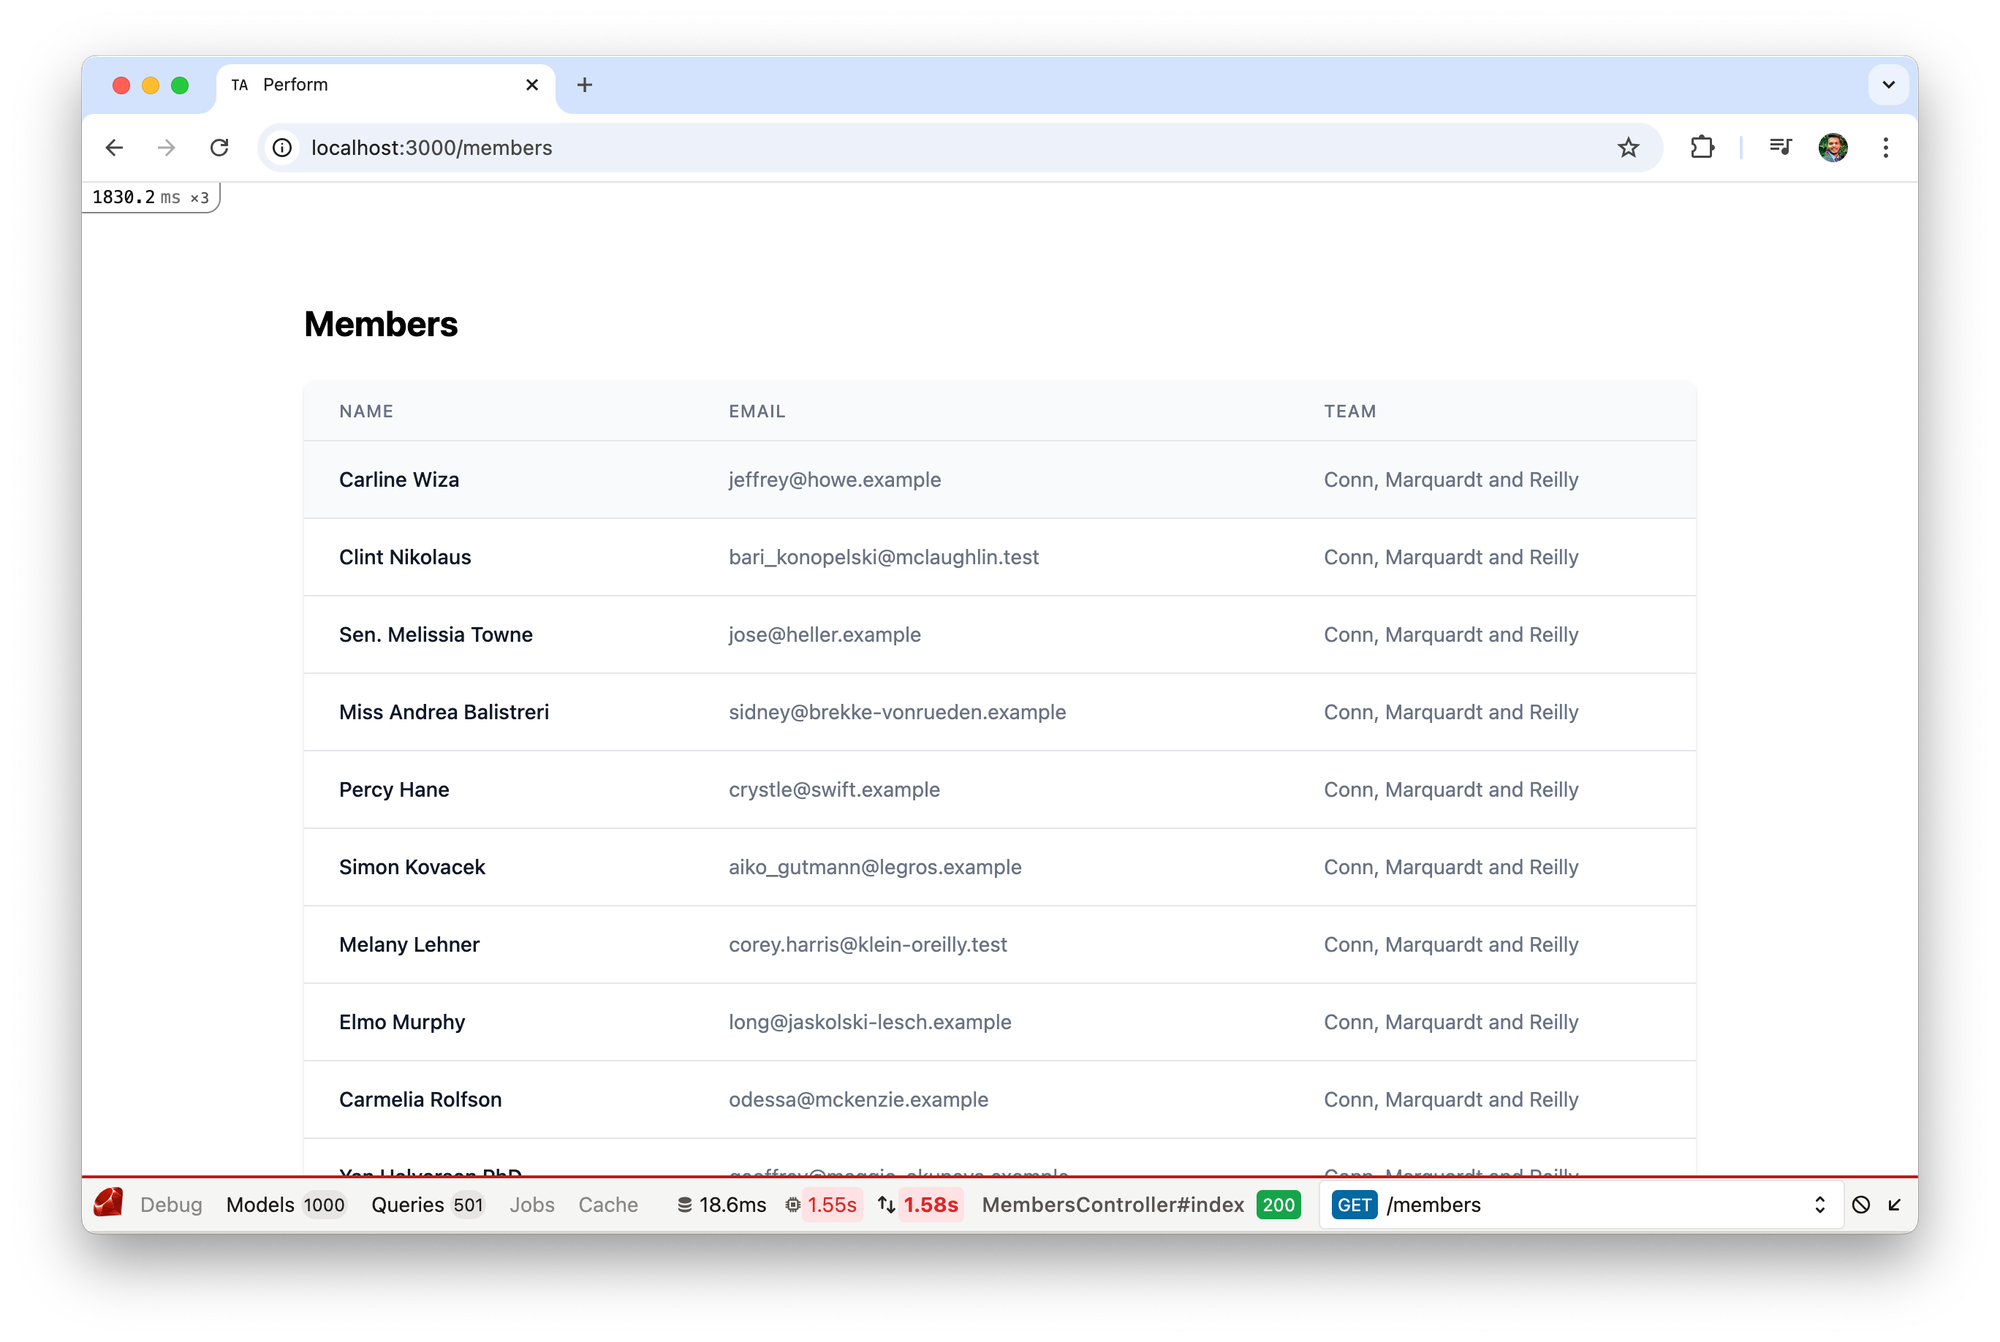
That's it. Reload the page and you should see the Debugbar at the bottom of the screen.

Exploring the Debugbar
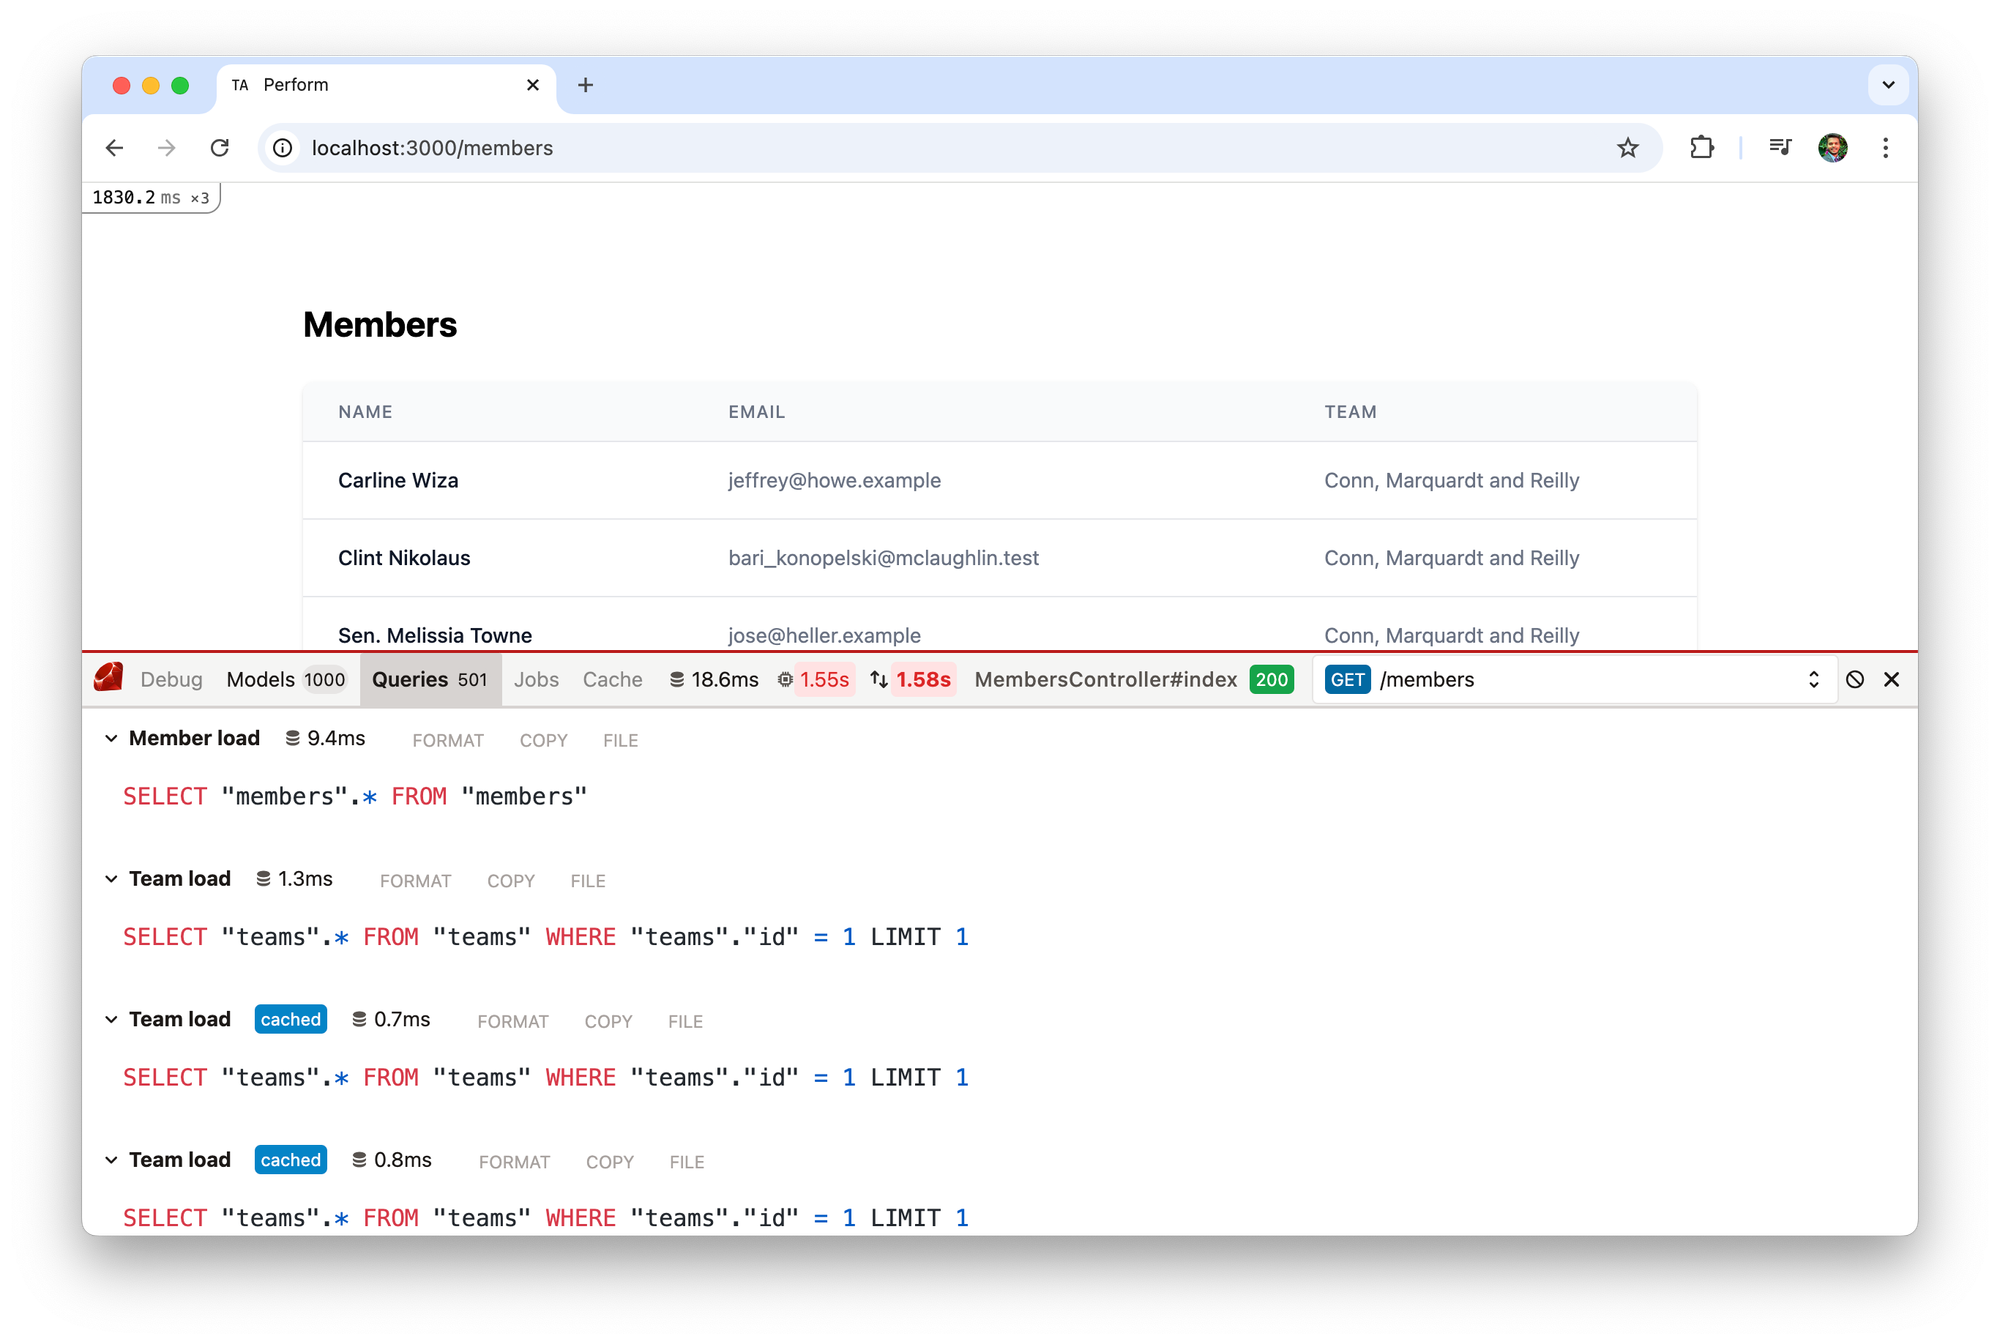
Click on the Queries tab. You’ll see a list of all SQL queries executed during the request.

As you can see, we're running quite a lot of queries to fetch the members and their teams. To load 500 members, we ran 501 queries, that tells me there's an N+1 query problem lurking somewhere. We'll fix that soon!
Now click on the Models tab. This shows how many Active Record objects were instantiated.

As you can see, we're loading over 1,000 objects just to render this page. 500 instances of the Member model makes sense, since there are 500 members. For 10 teams though, 500 objects seems a bit excessive.
Identifying the Problem
Before jumping into fixes, let's define the metrics we'll focus on:
- Page load time – How long does it take to render the page?
- Number of SQL queries – How many queries are executed per request?
- Query performance – How long does each query take? A single query that takes 10 seconds to run is no good over 3 queries that run in under a second.
- Object allocations – How many Active Record objects are instantiated?
It's super important that you catch these issues - ideally in development environment - as they often tend to get worse in production, where you're usually dealing with far more data.
As you can see, our /members page is taking almost 2 seconds to load, executing 501 SQL queries and instantiating 1000 objects. Clearly, there's room for improvement. Let's start by fixing the most obvious issue, the N+1 query.
What is the N+1 Query Problem?
The N+1 problem happens when an application makes one query to fetch a set of records (the "1") and then makes an additional query for each associated record (the "N"). I think it should be renamed to 1+N query problem - just saying.
This often happens with associations like has_many or belongs_to when they're accessed in a loop without eager loading them. As a result, what could have been done in two or three queries ends up triggering dozens or even hundreds, which slows things down.
In our case, we are first loading all members, which takes one query.
def index
  # SELECT "members".* FROM "members" ORDER BY "members"."name" ASC
  @members = Member.order(:name)
end
Then, in the index, we loop over each member to find its team by running a separate SQL query.
<% @members.each do |member| %>
  <tr class="hover:bg-gray-50">
    <td class="px-6 py-4 whitespace-nowrap text-sm text-gray-500">
      <%# SELECT "teams".* FROM "teams" WHERE "teams"."id" = 6 LIMIT 1 %>
      <%= member.team.name %>
    </td>
  </tr>
<% end %>
This results in 500 individual queries to fetch each member’s team—plus the original query to fetch the members themselves. That’s 501 queries total. Classic N+1 problemo.
Worse still, since many members belong to the same team, we're fetching and instantiating the same Team records over and over again. That’s not just inefficient—it’s also a waste of memory. Doing things that shouldn't be done at all.
Simple Fix for N+1: Eager Load
The easiest way to fix the N+1 problem in Rails is to load associated records up front. That is, instead of finding the team for each member in a separate query, we find all the teams in a single query alongside the members.
In Rails, you can use one of the includes eager_load, and preload methods to load the associations to avoid the N+1 query problem, but they work a bit differently under the hood:
preloadloads the main records in one query and then loads the associated records in a separate query. Rails then matches the associations in memory. This is usually more performant when you're not filtering or sorting based on the associated table.preloadalways uses separate queries.eager_loaduses a SQLLEFT OUTER JOINbetween the main and associated tables in a single query. This can be useful if you're querying or ordering based on fields from the associated table, but it may be less performant if you're dealing with large result sets.eager_loadalways uses a single LEFT JOIN query.includescombines the best of bothpreloadandeager_load. Rails will decide whether to useJOINor multiple queries based on how you use the associated data. A separate query is performed for each association, unless a join is required by conditions.
What should you use? 🤔
In most cases, you can safely use includes, and Rails will do the right thing. It is especially a better choice on larger tables, because it avoids unnecessary joins. Loading the associations in a separate query will often be faster over a simple join, as a join can result in many rows that contain redundant data.
However, if you want to reference associated records in a condition, using eager_load to join the tables is a better choice.
members = Member.includes(:team)
members.each do |member|
  member.team.name
end

# SELECT "members".* FROM "members"
# SELECT "teams".* FROM "teams" WHERE "teams"."id" IN (1,2,3,4,5)
Instead of loading teams 500 times with 500 separate queries, all teams are loaded with a single query.
Updating the Controller
Let's update our Members controller to include teams when we're fetching members.
class MembersController < ApplicationController
  def index
    @members = Member.includes(:team).order(:name)
  end
end
Now reload the /members page.

Remember that before this change, we were running 501 queries, instantiating 1,000 model objects, and the page was taking almost 2 seconds to load.
After the change:
- We’re down to 2 SQL queries—one for members, one for teams.
- Only 510 objects were instantiated (we have to instantiate 500 objects for members since we're showing them all).
- The page loads significantly faster.
Each team is now instantiated once and reused across members, eliminating unnecessary queries and reducing memory usage.

We're not done yet. There's one more enhancement we can make.
Speeding Things Up with a Database Index
Right now, we’re ordering members by name:
@members = Member.includes(:team).order(:name)With just 500 records, the query performs pretty well—it averages around 8.5ms, which is nothing to complain about. But in a production environment, things are rarely this small. You might have thousands or even hundreds of thousands of members. That’s when things start to slow down.
Sure, you’ll probably paginate results in the UI—but backend processes, exports, background jobs, or even simple lookups (like finding a member by name) might still need to work through the full dataset. And when they do, performance matters.
One of the easiest wins here is to add a database index on the name column.
Creating the Index
Let's generate a new migration to add the index:
$ bin/rails generate migration IndexMembersByNameThen, use the add_index method to index the members table by name column.
class IndexMembersByName < ActiveRecord::Migration[8.0]
  def change
    add_index :members, :name
  end
end
Finally, let's run the migration:
bin/rails db:migrateAdding an index improves application performance because it allows the database to find rows faster, without scanning the entire table. Think of it like the index in a book—it helps you jump straight to the page you need, rather than reading every page one by one.
In technical terms, an index creates a data structure (like a B-tree) that lets the database quickly locate rows based on the indexed column(s). This speeds up queries that use WHERE, JOIN, ORDER BY, or GROUP BY clauses on those columns, especially when dealing with large tables.
Wrap Up
Well, that's it for now. We’ve covered how to use Rails Debugbar to identify and fix common performance issues in a Rails app—N+1 queries, unnecessary object allocations, and missing indexes. These are small changes, but they have a measurable impact on page load times and memory usage.
In upcoming posts, we’ll go deeper into Active Record performance. Lately, I’ve been getting more interested in how to write faster, more efficient Active Record code. In future posts, I’ll be digging into topics like avoiding unnecessary queries, fetching only data you need, and working with large datasets effectively. All based on real-world examples from the projects I’m working on.
So stay tuned, and if you haven't already, subscribe to my blog and join thousands of other Ruby on Rails developers all over the world.
That's a wrap. I hope you found this article helpful and you learned something new.
As always, if you have any questions or feedback, didn't understand something, or found a mistake, please leave a comment below or send me an email. I reply to all emails I get from developers, and I look forward to hearing from you.
If you'd like to receive future articles directly in your email, please subscribe to my blog. Your email is respected, never shared, rented, sold or spammed. If you're already a subscriber, thank you.

